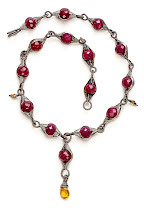
June 01, 2009

Etsy Finally Hits


For all of you who have requested kits I have just opened my ETSY store. If the one you are looking for is not listed please feel free to contact me about availability. I am working to get as many online as I can.

I have just opened my Etsy store: LisasKitchenSink

On this site you will find my latest and greatest Kits. Over the next few weeks more kits will be added as requested. If you have suggestions of items you would like to see, drop me a line, feedback is greatly appreciated.

May 10, 2009

How to Start a Jewelry Journal

If you haven't started your Jewelry Journal this post is here to get you started.

What is it about? This is not a "these beads make me feel funny" journal, well actually it might be depending on how into beads you are. More to the point it is a journal in which you chronical your likes and dislike, report (a later reminder) technical difficulties and sketch out future designs.

Getting Started:

Go pick yourself out a cute blank book that is so sweet that it will call your name to come and fill it with content. Procrastinators may chose to buy a simple design and then spend the next 3 months decorating the cover, as you will.

10 Tasks to Get the Journal Going:


1. Find 5 pictures of jewelry you admire and glue them in the book, do the same for 5 yucky pieces. Write a list of your likes and dislikes of each piece. What would you do better, different, or omit
? If you are new to design this task will help you discover your own design style and taste.

2. Write a list of all the jewelry techniques you know. Put stars by the ones you are really good at.

3. Make a list of techniques you want to learn.

4. Draw a picture of a pair of earrings. Remember this is your journal so it doesn't have to be a fine art drawing, in fact lets just say "sketch" a pair of earrings. Try to include details like a bead cap or the wraps of a wire wrap. Use colored pencils to show off your style.

5. Make those earrings. If the design changes, write a note by the original drawing stating what changed and why.

6. Write down five projects you want to make. These projects can be in the beginning stages, say something like "a bracelet with those sexy little faceted rubies I bought in India while I was searching for my guru." Or a necklace for my sister with a chunky pendant that takes away from that awful haircut she just got that I can't admit to her about. (This is just an example Beth, your haircut is fine.)

7. Write a list of your material preferences. Do you like metal and which ones are your favorite and why? Do you love stones and which stones rock your boat? Are you a seed beader and why do you work with them? Try to relate some of your material preferences to aspects of your life. For example, I weave wire because it continues my childhood struggle of trying to make something beautiful out of cold hard reality. This task requires a proper atmosphere: light some candles, get a glass of wine, or put some heavy metal on the radio, whatever you need to get the words flowing.

8. Find amongst your jewels the designs that you consider to be original. Write a few of them up in your journal. What inspired you, why did you use what you used, what would you do differently next time? Do this task every time you make something.

9. Spend 1 hour cleaning up and sorting beads in search of inspiration.

10. Repeat the previous steps until you don't have to think about it any more and the journal begins a life of its own. Enjoy!

I'd love to hear comments on this. Do you already have a journal? Do you have any tips that may help others get it going?


March 30, 2009

Bead Away -LAS VEGAS


Gosh, the Las Vegas show was a whirlwind! I love the smaller venues for classes. This was my first year teaching for Bead Away. Scott and Wendy Remmers from La Brea Beadworks hosted the event. They put on a great selection of classes that included PMC, seedbeads, wire work and metalsmithing. The photo on the right is of a very talented student working away at her Breakup Ring.

One of the things I love about traveling is visiting new places. Good thin this visit to Vegas was more about beads than gambling. I lost $40 on the slot machines in about a time span of about 20 minutes. Luckily, it was the last night of my stay so I needed to head back to the hotel to pack up.

The big question on everyone's mind now is...where will Bead Away be held next year?

March 20, 2009

Newest Work

Oh it is sooo exciting when you make a new design. Back in the old days I would work something up in secret and as soon as it was completed I'd wear it to work. The benefit of working in a Bead Store was that everyone would notice what you made and appreciate the time it took to create, plus they understand how important it is to jump up and down and "ohhh & ahhh" it all. This is why it is important to have artistic friends. These days I have to admit that my cat isn't as impressed as I wish he would be. So instead I present to my blog my new work......
The Leaf Cluster Pendant (small version)
...wait till you see the big one

February 18, 2009

Where do the designs come from?

I have had several conversations lately with students regarding a general lack of design classes.
It brings to mind many questions. Why do I choose those beads: textures, colors and material. Why do I use fine silver wire, why do I weave or wrap or coil, is this a necklace or earring or bracelet and why exactly choose one over the other? There are so many details that go into a single project that a full description of why would take you through years of boring life details and preferences and a few professional decisions.

On a particular day of procrastination I decided to organize all photos on my computer. In the process I found a sketch of an idea, the purpose of this post. For many years I have taught evening classes for Hooked On Wire. Each year I try to come up with a new project for the retreat and each year I wait till the last minute. One particular year I was very bad and found myself sketching the day my idea was due. I sent it in for approval. Man, these ladies have faith as it was accepted.

Now I had to make it. Things don't always work out like they are planned. After making a few pieces I discovered what worked best for the earrings. So let's pick it apart:

Wire: cause I like a little friction in my life.
Silver metal: cause it is cheaper than 14K while gold and takes on a great patina.
Sterling warps: because it is a hard enough metal that I know they will hold up to casual touchy, touchy that we all do with our earrings.
Fine Silver wefts: because a challenge is fine so long as I will win in the end (fine silver doesn't work harden as quickly as sterling)
Spirals and curls to end: because it is the easiest way to decoratively end a wire.
Blackened patina: because it shows the detail of frustration achieved while trying to weave wire.
Rubies: because I managed a bead store for 10 years and know my way around a good bead.
The title: Ionic Column Earrings because Emily Miller suggested it and she is a rock star when it comes to conjuring up a good name.

Every piece of jewelry that we make is a reflection of everything we have ever made, the materials that are available to us, the inspiration that drove us to make something in the first place and many other indeterminable factors that often elude us. Above is a design that for myself is rather straightforward, draw it out, work it up, add some beads. My best pieces allude me for many months, even year, and seem to fall out of my hands with surprise.

Why do you do what you do and what influences drive you?

February 01, 2009

Simple Loop Making with LNK

My mom has been checking this blog of late. It come to mind that some people may be so new to wire that even a simple loop means agony. For those of you who need a refresher I now present you with a video by Lisa Niven Kelly of Beaducation demonstrating this technique. Enjoy.


Gosh, she is good. In fact here is Part 2.....


She offers several freebie videos on her website (see link above).

January 26, 2009

Free Tutorial: Wire Chain Stitch Choker


Materials Needed
15ft 26g Fine silver wire
4-4.5mm crochet hook
4-6mm beads of mixed type and textures

2 cones w/ 8mm open ends
1 Sterling silver clasp
This is a loose version of a class I previously taught called Simple Wire Crochet. It uses basic chain-stitching techniques to connect beads into a flexible and bouncy chain. Work up several strands to make a great necklace that catches the light with every movement.
A little basic wirework technique goes a long way when finishing off the necklace clasp.

Making a Beaded Chain

1. String 12” of beads onto the wire.

2. Make a loop 4” from the end of the wire. (The hook should fit loosely inside the loop.) Secure the loop by wrapping the short wire around 2 times.

Hold the hook like a pencil in the dominant hand. The beaded wire is held in the non-dominant hand. Tension is maintained by feeding the wire over the index finder.

3. Push a bead up against the hook.

The chain is held with the thumb & middle finger of the non-dominant hand. This grip is used to pull the chain down as the crochet progresses.

4. Yarn Over (YO) Wrap the wire ar-ound the hook by bringing the hook under the wire from front to back. Turn the hook so that it points downward and catches the wire.

5. Pull the hook through the loop (lp) on the hook. This is the first chain stitch (ch st) made.
After the first completed chain stitch (ch st): push downward, against the bead, with the thumb & middle finger for leverage when pulling the hook through a loop.

1. Push a bead against the chain
2. YO
3. Pull hook through lp on hook
4. Repeat 1-3 until desired length


Finishing the Strands and Connecting the Clasp

Finish each strand by running the working wire through the final loop. Secure it by wrapping the wire several times around the last loop. These wraps will be hidden inside the cones. To learn more about how to make a simple loop check out Lisa Niven Kelly's website, Beaducation, to view a few free tutorials.

Attach several strands together by using cones to secure and hide the crochet wire ends.

1. Using 6” of 22g wire, make a loop and string the last loop of each strand onto it.
2. Secure the loop by wire wrapping it closed.
3. Cut the wire end flush.
4. String on the cone.
5. Make a wire wrapped loop, attaching the clasp before wrapping. Use a bead on the wire between the cone and the wrap to stabilize the cone.
6. Repeat the above steps to finish the second side.