December 12, 2009

Earrings, Bullets & Doilies, Oh My!!


In 2003 a tornado hit my parents house. At the time, my mother had taken my father to a last hope cancer clinic in Mexico.

The next day I flew down to Tennessee to help my sister reclaim my mother’s house, as we knew that Dad was coming home to die. They lived in a log home, so much of it was spared less the 20,000 gallons of water from the lake that replaced the roof. I spent the next week trolling through everything they owned cleaning up and clearing out.

In time a pattern emerged. In every nook and cranny of all things small, little tokens of those who lived there became apparent. My father’s tokens were ammunition (remember urbanites, we are talking about a log cabin in Tennessee.) I don’t know what kind they were, all I saw were little bullets everywhere. My sister’s stamp was earrings. Not necessarily in pair form. Just a lonely earring, abandoned over the course of 15 years, tucked away for me to find. And my mother, little crochet doilies everywhere. She didn’t make them, but when you live in Tennessee they aren’t hard to come by.

Open a drawer, look in a teapot, on top of the bookcase, in the bathroom you will find a bullet, an earring and a doily, parts of my family.

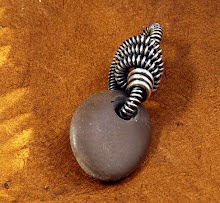
And now I’m stuck. Crocheting these little wire doilies that keep reminding me of that time. A time when everything was coming apart at the seams and comfort was found in the familiar signs of everything that annoys me about my family.

December 03, 2009

Horray, my mom will be so proud!


Just in, the Bead & Button Show 2010 just revealed their cover for the class catalog. I am humbled to jump up and down and point excitedly at my Leaf Cluster Pendant as the wire representative! Many thanks to Kirstyn Russell for learning how to photograph jewelry, who knew it was so different from landscape photography. Nothing feels as strange as having something you made on a poster or front cover. No biggie, except that I will need to print out 100 copies and distribute them to everyone I know.

Now we just need to wait until they send out the catalog so that we can all drool all over their 600+ classes offered in a mere 7 day span.

November 19, 2009

Call it what you will, just don't call it the garage!!

I've been in my new house & studio for a month now. In the battle of time my house has been the winner so today I'm shifting gears. My new jewelry digs are alas, located in the one car garage. We just bought a duplex and our tenant has a garage beside mine. She uses her's as her Letterpress studio so I have high hopes that we get positive creative juices flowing between our walls.

Today's project was to photograph the setup of the space. Ah, all projects have ulterior motives, mine was to create a reason to put things away and unpack a bit more and take to take the garage out of the garage. After painting every room in the house I have elected to wait out some time before I paint the studio. A student of mine from San Rafael inspired me to express the mood I desire while working through paint. Another day another project, I'm still young.

So here goes... The Studio in Progress.


My bead cabinet is my pride and joy. I purchased it about 10 years ago at an antique store for $500. (Worth every penny) There are 24 drawers that measure 18" x 36". Inside are all my single bead treasures, clasp collection and lovely things to touch and behold. Each drawer is removable from the cabinet so I can spread out.


Of course what thrifty beader could do without IKEA? Each of these cabinets and wooden boxes came from that lovely DIY place. The little drawers served me well in the move. I labeled each drawer as to what mess was inside and just packed up all those loose beads, findings, chain, hoo-haas that seem to pentrate every crack and crevice of a beaders life. From the photo you may think everything is nicely put away but every good wire worker knows that there is often a mess hidden behind the embellishment.


Then we have the jeweler's bench. I purchased this at Otto Frei years back for about $750. I LOVE my bench. I'll admit, a dining table works fine but there is something to be said about having a table top surface that no one else in the house would use. My tools love the bench too. Someday far, far, far away, when everything is organized, I will make a photo tour of all the tools that live inside it.


And just like life, there is often a dark side. Behind all things cleared away and organized, I have a wall of boxes waiting for attention.


September 29, 2009

Metal Arts Association of Silicon Valley


All these years I have lived in the Bay Area and only because of Maureen Delema did I find out about MAASV. I am so excited to see such a great local organization that I have posted a few pics from their website, click any pic and it will take you to the website.


My latest jewelry obsession these past couple weeks has been crocheting with wire. MAASV is offering a two day workshop with Arline Fisch on October 10-11th in San Jose. I have had a secret artist crush on her for many years. If you aren't familiar with her work get to the Google search bar right away.

September 21, 2009

The Last Grandparent Standing


Grandmother exhibited many talents, from gutting fish to knitting a knobbly sweater, all in a day's work. There are remnants of her exhibits around my home, minus the scaled fish. A quilt she made me in college, a denim apron with my nephews handprints painted on it (great for chemical patina protection), to a pillow that converts into a throw. When I was little girl I resented her encouragement to learn these finer female crafts. Outside was always more fun.

Grandpa was a welder. By the time I was born his 4 car garage was a wonderland of greasy dark finger chopping tinker tools that provided no hope for a car seeking respite. Against Grandma's wishes us grandkid's loved to sneak a peek at the urinal in the back of the garage. It was a porcelain idol for men who knew tools and drank beer in the afternoon. When Grandpa would weld, the orange sparks would fan out but we didn’t dare look as our eyes might shrivel up as if we were looking into an eclipse.

After the final funeral my heart went out to my grandmother and the activities that I refused her. I wonder if I told her that I can garden, knit and crochet, learned long after I set up my own home. I see her sewing machines, left now abandon, and wish I had had her teach me to sew. So I collected my inheritance from her studio. Her scissors, needles, crochet hooks, a pin cushion (because like a good woman she had three) and a collection of vintage German glass buttons I gave her many years ago that I am sure were a bit too fancy for her work.

And now I stand on the other side of that life. That generation has passed and now my mother is the grandma and I am no longer the granddaughter. Grandpa, I'll see your metal with some wire and raise you a crochet hook from Grandmother and may I build a strong family fabric to bring it all together.

August 17, 2009

The Computer Monster

I get quite a bit of flack at home for not posting often enough on my blog. After a bit of soul searching I recognize that I have lost direction in my work. Maybe it is that word alone that has misguided me. WORK It has been almost 2 years since I worked full time for someone else, so I must question why has my brain applied that dirty little word to my favorite thing: making jewelry.

There is a new day dawning here. I am about to move (keep your fingers crossed that all goes well on this front) and I have decided to take the computer out of the studio (can you hear the record scratch in the background?). For me it's like I just said when I move I won't be taking the TV along.

The hope here is that I can separate myself from the noise of tempting clicks to be had and refocus on the quiet inside that guides me to make and create and enjoy the activity that drives me most. While I'm at it I would also like to leave my big beader's butt in the studio whenever I leave. Hmm, it's gonna take a while to figure that one out.

July 23, 2009

Wire Hand Tools & Me

I'm a tool junkie, I can admit it. I have so many tools in my drawer and each one has a special place in my heart (and hand). Writing about them is like taking a trip down the Lost & Forgotten Love Memory Trail.

Take my roundnose pliers for instance. My first pair was bought in Boston at Beadworks when I was 20 yrs old. I worked at this beadstore for about a year and it was a slice of heaven for a new beader. The pliers are German with a red rubber coating on the handles. One may think I am fancy as my first pair were German pliers but alas, before this tool was welcomed into the fold I was using a serrated chainnose plier to make "triangles" on the top of my earrings. I still have both of those tools.

Then came the German Ergonomic handles. At first sight I was excited by their sexy red and black striped handles, teasing me to hold them and spin then about inside a loop of wire. These I picked up about 9 years ago at my local store. They are still my favorite for working wire that is 20g or heavier.

Next came the Lindstroms. When you read Lindstrom think diamonds. This lovely tool features a light weight, cool-blue and black ergo handle with such fine tips on the jaws that wire wrapping with 28g wire is a miniature lovers dream. These are my babies, they are always in play for wires smaller than 20g.

Of late I have developed a secret lust for a 1/2 round-1/2 chainnose plier. I know, I know it's not a "normal" tool but I just love how that chainnose jaw keeps me from dinging the outside of my loops on heavy gauge wire. Mock me if you will, this tool will one day be a hot ticket item.

But this is just a list of my roundnose; let us not forget the wire cutters, nylon-jaw flat nose and chainnose (with it's bent-nose cousin in tow.) Move aside files and hammers, this post is about Wire Hand Tools!

What kind of hand tools do you love and why? I'd love it if any reader would like to share your tool stories via comments.

June 24, 2009

Studio Angel


Franklin was the most annoying studio cat ever! When he would hear the hiss of the torch it was like I was shaking food in a bowl. When I sat at my computer, there he was, trying to get his fat little body to fit between me and the desk. He had good taste too, forget the copper wire, sterling wire was where it was at. Oh, and French Bullion Wire is sooo much fun to stretch all over the house.

Rest in Peace Franklin, I'll miss you keeping me company in the studio and only remember your good traits.

Although diabetes is not what brought him down, I owe a huge debt to the Feline Diabetes Message Board for their support during his illness.

A very short list of his nicknames included: Little Bear, Special Sauce, Lunch Box, Frank-n-Stuff, Frankenstein & Cranklin.

June 01, 2009

Etsy Finally Hits


For all of you who have requested kits I have just opened my ETSY store. If the one you are looking for is not listed please feel free to contact me about availability. I am working to get as many online as I can.

I have just opened my Etsy store: LisasKitchenSink

On this site you will find my latest and greatest Kits. Over the next few weeks more kits will be added as requested. If you have suggestions of items you would like to see, drop me a line, feedback is greatly appreciated.

May 10, 2009

How to Start a Jewelry Journal

If you haven't started your Jewelry Journal this post is here to get you started.

What is it about? This is not a "these beads make me feel funny" journal, well actually it might be depending on how into beads you are. More to the point it is a journal in which you chronical your likes and dislike, report (a later reminder) technical difficulties and sketch out future designs.

Getting Started:

Go pick yourself out a cute blank book that is so sweet that it will call your name to come and fill it with content. Procrastinators may chose to buy a simple design and then spend the next 3 months decorating the cover, as you will.

10 Tasks to Get the Journal Going:


1. Find 5 pictures of jewelry you admire and glue them in the book, do the same for 5 yucky pieces. Write a list of your likes and dislikes of each piece. What would you do better, different, or omit
? If you are new to design this task will help you discover your own design style and taste.

2. Write a list of all the jewelry techniques you know. Put stars by the ones you are really good at.

3. Make a list of techniques you want to learn.

4. Draw a picture of a pair of earrings. Remember this is your journal so it doesn't have to be a fine art drawing, in fact lets just say "sketch" a pair of earrings. Try to include details like a bead cap or the wraps of a wire wrap. Use colored pencils to show off your style.

5. Make those earrings. If the design changes, write a note by the original drawing stating what changed and why.

6. Write down five projects you want to make. These projects can be in the beginning stages, say something like "a bracelet with those sexy little faceted rubies I bought in India while I was searching for my guru." Or a necklace for my sister with a chunky pendant that takes away from that awful haircut she just got that I can't admit to her about. (This is just an example Beth, your haircut is fine.)

7. Write a list of your material preferences. Do you like metal and which ones are your favorite and why? Do you love stones and which stones rock your boat? Are you a seed beader and why do you work with them? Try to relate some of your material preferences to aspects of your life. For example, I weave wire because it continues my childhood struggle of trying to make something beautiful out of cold hard reality. This task requires a proper atmosphere: light some candles, get a glass of wine, or put some heavy metal on the radio, whatever you need to get the words flowing.

8. Find amongst your jewels the designs that you consider to be original. Write a few of them up in your journal. What inspired you, why did you use what you used, what would you do differently next time? Do this task every time you make something.

9. Spend 1 hour cleaning up and sorting beads in search of inspiration.

10. Repeat the previous steps until you don't have to think about it any more and the journal begins a life of its own. Enjoy!

I'd love to hear comments on this. Do you already have a journal? Do you have any tips that may help others get it going?


March 30, 2009

Bead Away -LAS VEGAS


Gosh, the Las Vegas show was a whirlwind! I love the smaller venues for classes. This was my first year teaching for Bead Away. Scott and Wendy Remmers from La Brea Beadworks hosted the event. They put on a great selection of classes that included PMC, seedbeads, wire work and metalsmithing. The photo on the right is of a very talented student working away at her Breakup Ring.

One of the things I love about traveling is visiting new places. Good thin this visit to Vegas was more about beads than gambling. I lost $40 on the slot machines in about a time span of about 20 minutes. Luckily, it was the last night of my stay so I needed to head back to the hotel to pack up.

The big question on everyone's mind now is...where will Bead Away be held next year?

March 20, 2009

Newest Work

Oh it is sooo exciting when you make a new design. Back in the old days I would work something up in secret and as soon as it was completed I'd wear it to work. The benefit of working in a Bead Store was that everyone would notice what you made and appreciate the time it took to create, plus they understand how important it is to jump up and down and "ohhh & ahhh" it all. This is why it is important to have artistic friends. These days I have to admit that my cat isn't as impressed as I wish he would be. So instead I present to my blog my new work......
The Leaf Cluster Pendant (small version)
...wait till you see the big one

February 18, 2009

Where do the designs come from?

I have had several conversations lately with students regarding a general lack of design classes.
It brings to mind many questions. Why do I choose those beads: textures, colors and material. Why do I use fine silver wire, why do I weave or wrap or coil, is this a necklace or earring or bracelet and why exactly choose one over the other? There are so many details that go into a single project that a full description of why would take you through years of boring life details and preferences and a few professional decisions.

On a particular day of procrastination I decided to organize all photos on my computer. In the process I found a sketch of an idea, the purpose of this post. For many years I have taught evening classes for Hooked On Wire. Each year I try to come up with a new project for the retreat and each year I wait till the last minute. One particular year I was very bad and found myself sketching the day my idea was due. I sent it in for approval. Man, these ladies have faith as it was accepted.

Now I had to make it. Things don't always work out like they are planned. After making a few pieces I discovered what worked best for the earrings. So let's pick it apart:

Wire: cause I like a little friction in my life.
Silver metal: cause it is cheaper than 14K while gold and takes on a great patina.
Sterling warps: because it is a hard enough metal that I know they will hold up to casual touchy, touchy that we all do with our earrings.
Fine Silver wefts: because a challenge is fine so long as I will win in the end (fine silver doesn't work harden as quickly as sterling)
Spirals and curls to end: because it is the easiest way to decoratively end a wire.
Blackened patina: because it shows the detail of frustration achieved while trying to weave wire.
Rubies: because I managed a bead store for 10 years and know my way around a good bead.
The title: Ionic Column Earrings because Emily Miller suggested it and she is a rock star when it comes to conjuring up a good name.

Every piece of jewelry that we make is a reflection of everything we have ever made, the materials that are available to us, the inspiration that drove us to make something in the first place and many other indeterminable factors that often elude us. Above is a design that for myself is rather straightforward, draw it out, work it up, add some beads. My best pieces allude me for many months, even year, and seem to fall out of my hands with surprise.

Why do you do what you do and what influences drive you?

February 01, 2009

Simple Loop Making with LNK

My mom has been checking this blog of late. It come to mind that some people may be so new to wire that even a simple loop means agony. For those of you who need a refresher I now present you with a video by Lisa Niven Kelly of Beaducation demonstrating this technique. Enjoy.


Gosh, she is good. In fact here is Part 2.....


She offers several freebie videos on her website (see link above).

January 26, 2009

Free Tutorial: Wire Chain Stitch Choker


Materials Needed
15ft 26g Fine silver wire
4-4.5mm crochet hook
4-6mm beads of mixed type and textures

2 cones w/ 8mm open ends
1 Sterling silver clasp
This is a loose version of a class I previously taught called Simple Wire Crochet. It uses basic chain-stitching techniques to connect beads into a flexible and bouncy chain. Work up several strands to make a great necklace that catches the light with every movement.
A little basic wirework technique goes a long way when finishing off the necklace clasp.

Making a Beaded Chain

1. String 12” of beads onto the wire.

2. Make a loop 4” from the end of the wire. (The hook should fit loosely inside the loop.) Secure the loop by wrapping the short wire around 2 times.

Hold the hook like a pencil in the dominant hand. The beaded wire is held in the non-dominant hand. Tension is maintained by feeding the wire over the index finder.

3. Push a bead up against the hook.

The chain is held with the thumb & middle finger of the non-dominant hand. This grip is used to pull the chain down as the crochet progresses.

4. Yarn Over (YO) Wrap the wire ar-ound the hook by bringing the hook under the wire from front to back. Turn the hook so that it points downward and catches the wire.

5. Pull the hook through the loop (lp) on the hook. This is the first chain stitch (ch st) made.
After the first completed chain stitch (ch st): push downward, against the bead, with the thumb & middle finger for leverage when pulling the hook through a loop.

1. Push a bead against the chain
2. YO
3. Pull hook through lp on hook
4. Repeat 1-3 until desired length


Finishing the Strands and Connecting the Clasp

Finish each strand by running the working wire through the final loop. Secure it by wrapping the wire several times around the last loop. These wraps will be hidden inside the cones. To learn more about how to make a simple loop check out Lisa Niven Kelly's website, Beaducation, to view a few free tutorials.

Attach several strands together by using cones to secure and hide the crochet wire ends.

1. Using 6” of 22g wire, make a loop and string the last loop of each strand onto it.
2. Secure the loop by wire wrapping it closed.
3. Cut the wire end flush.
4. String on the cone.
5. Make a wire wrapped loop, attaching the clasp before wrapping. Use a bead on the wire between the cone and the wrap to stabilize the cone.
6. Repeat the above steps to finish the second side.