January 26, 2009

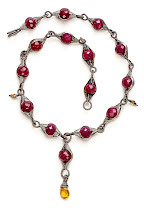
Free Tutorial: Wire Chain Stitch Choker


Materials Needed
15ft 26g Fine silver wire
4-4.5mm crochet hook
4-6mm beads of mixed type and textures

2 cones w/ 8mm open ends
1 Sterling silver clasp
This is a loose version of a class I previously taught called Simple Wire Crochet. It uses basic chain-stitching techniques to connect beads into a flexible and bouncy chain. Work up several strands to make a great necklace that catches the light with every movement.
A little basic wirework technique goes a long way when finishing off the necklace clasp.

Making a Beaded Chain

1. String 12” of beads onto the wire.

2. Make a loop 4” from the end of the wire. (The hook should fit loosely inside the loop.) Secure the loop by wrapping the short wire around 2 times.

Hold the hook like a pencil in the dominant hand. The beaded wire is held in the non-dominant hand. Tension is maintained by feeding the wire over the index finder.

3. Push a bead up against the hook.

The chain is held with the thumb & middle finger of the non-dominant hand. This grip is used to pull the chain down as the crochet progresses.

4. Yarn Over (YO) Wrap the wire ar-ound the hook by bringing the hook under the wire from front to back. Turn the hook so that it points downward and catches the wire.

5. Pull the hook through the loop (lp) on the hook. This is the first chain stitch (ch st) made.
After the first completed chain stitch (ch st): push downward, against the bead, with the thumb & middle finger for leverage when pulling the hook through a loop.

1. Push a bead against the chain
2. YO
3. Pull hook through lp on hook
4. Repeat 1-3 until desired length


Finishing the Strands and Connecting the Clasp

Finish each strand by running the working wire through the final loop. Secure it by wrapping the wire several times around the last loop. These wraps will be hidden inside the cones. To learn more about how to make a simple loop check out Lisa Niven Kelly's website, Beaducation, to view a few free tutorials.

Attach several strands together by using cones to secure and hide the crochet wire ends.

1. Using 6” of 22g wire, make a loop and string the last loop of each strand onto it.
2. Secure the loop by wire wrapping it closed.
3. Cut the wire end flush.
4. String on the cone.
5. Make a wire wrapped loop, attaching the clasp before wrapping. Use a bead on the wire between the cone and the wrap to stabilize the cone.
6. Repeat the above steps to finish the second side.

November 17, 2008

The Lortone Tumbler and You

In many of my classes we talk about how the tumbler is your friend till the end. It can be a big expense in the beginning but after a few uses you will wonder how you ever did without it.
Below is a video from Cool Tools (be sure to check out their other great videos). They were kind enough to make a video explaining how and why we tumble.

Enjoy

November 03, 2008

Non Profit anyone?

I am lucky. My mom once said that things seem to always work out for me. If you are reading this blog at home in a heated house, on your own wifi-connected computer then you are lucky too. It's funny how easy it is to forget our own privileges and to respect the idea that these things must be shared in order to be maintained.

Four years ago I joined the board of directors of the Bead Society of Northern California. My original goal of becoming involved with the group was to be able to promote educational beading programs that did not require "turning a profit." Finally our bead society has been recognized as just that, a non-profit.

Over the next couple months I will be compiling a list of groups that need contributions, recognition or volunteer activities. Help me discover other programs that use beads to educate and sustain our communities and cultural diversity. Please comment below or email me any information of groups that you think need the word spread about their activities. I will do my best to share this information with all my students and fellow bead society members.

It all begins with us, check out Beads of Courage by clicking on the picture below.

October 07, 2008

Teaching Someone Else's Design

I have a friend whose favorite pastime is to find my designs online being taught by past students. (Pls. note, I have given a few students written permission to do this.) Hmm, maybe she is not really my friend, as each new discovery sends my stomach into clenched frustration. So I ask:
Is it okay to teach a design you learned in class?

I often relate the situation of students teaching my designs to buying a handbag. You can buy a Coach bag at the store or you can buy one on the street for a lot less. Later when you get home, you may find the one you bought on the street has a label inside that spells Cooch instead (oh my gosh, I gotta make a bag tag that says that).

My designs are a pathway for me to teach my students the path of creativity. I begin with a wire and twelve attempts later come out with a new project. For me, the shining star of my classes is being able to convey to students how the design was born and how they can draw from their own experience to later create their own pathways and designs.

But alas, I have yet to be hired as the world leader of Because I Say So. Do you have thoughts on this? Please take some time to think about what your opinion is. Share it in a comment or keep it rumbling inside your head. If there was a clear answer here I'd quote it, but right now we are just throwing opinions.
Thanks,
Lisa

September 18, 2008

Upcoming Shows

For 2009 I have introduced several new classes. Of course they all use wire and many of them even melt the said wire with a torch. Over the past year my work has shifted a bit to include more low-tech meltalsmithing. Fusing and melting wire has left me in a daze and I love to show it off any chance I get. Plus, hitting things with hammers feels good.

Shows for 2008-2009 include: (will update class links and other show dates as they become available)

Bead Fest: Santa Fe
March 14 & 15th Classes Include: Wire Bezel Wrap, 20 Minute Spiral Ring, The Hug Ring

Bead Away: Las Vegas, Baby
March 26-30th Classes include: Woven Wire Cuff, 20 Minute Spiral Ring, The Breakup Ring, Hug Ring

Bead Expo-Wire: King of Prussia, PA
May 1-3rd

Bead & Button: Milwaukee, WI
May 31- June 7th

Leaf Drop Earrings: These earrings are not only beautiful to behold but quick to make and the techniques can be used to create many different styles and components. At the top is a delicate woven wire cap designed to showcase the semi-precious stone beads below that are wrapped with fine wire to the inside of the frame.


The Hug Ring:
The marriage of fine silver metallurgy and wire weaving brings together the striking form of this ring. Students will learn how to draw a single bead made up of two wires with a torch, shape it into a ring form and apply woven wire embellishment. The variations of this technique are endless.


The Eclipse Chain:
(A fitting name as the first time I taught this class was
during a Lunar eclipse.)

Designed for students who have already been introduced to fusing with fine silver, this chain design is sure to leave those who gaze upon it lost in wonder. The inner rings seem to float freely over one another while the individual texture of each ring catches the eye. Students will cut their own jump rings, review the basics of fusing, fuse a multi-layered chain and add texture to the wire itself.

August 27, 2008

The Breakup Ring aka What's in a Name

I've struggled for many years trying to see art in the work that I do. Making jewelry is a lot like a woman chef or hairdresser, it can come naturally and who cares cause it's kinda expected of a girl anyway. Is it just because I like to make pretty things, is there anything deeper behind it? For those who work outside of the established art community it can take some time to discover that much of what we make says something whether we recognize it ourselves or not.
It hit me hardest in 2006. I got dumped. It wasn't like the ending relationship lasted long enough to devastate me, it was more an issue of not being the one to make that decision first. So I got out of bed the next day and went to the jeweler's bench (at the time it had replaced the table in the kitchen). In a single day, with no planned design I made The Breakup Ring and it kicked ass. It was one of those pieces you look at after you're done and get so excited cause you can't believe you just made that.
Since then I have begun to reflect more on each new piece and make a point to discover what brought out the design. (I could try and play it cool here and pretend that I know what I'm
doing when I'm doing it, but alas I'm a little slow in the obvious at times.) These days I find it is all in the name. When I teach a design, I have to title the piece. At times this can turn into a quiz for my friends/family; those who know me best are the ones who usually name it right if I can't.
What's next? don't I wish I knew. I do know it involves fire, let's hope this is a reflection of the fire glowing within. Art is after all messy work.
Something to look forward to: A photo shoot this weekend that will resonate the transitional qualities of human (read: my) relationships over several years in jewelry. Will post those pics soon.

August 20, 2008

Pretty Things


The task of cleaning up the studio is taking longer than expected. One big shopping trip to Ikea, a set of curtains in the mail and hopefully a rug soon to be chosen will provide the atmosphere I think I need. While I wait for these things to come together, I take stock of the jewelry I admire most. Last year at the Puget Sound Bead Festival I ran into Kriss Silva and we traded one of my 20 Minute Spiral Rings for one of her Riveted Rock Band Rings. (I think I got the better end of the trade.) She is currently living the hard life in Hawaii and only teaches a few times a year on the mainland.